
13.5: Multi-Factor Between-Subjects
- Page ID
- 28987

\( \newcommand{\vecs}[1]{\overset { \scriptstyle \rightharpoonup} {\mathbf{#1}} } \)
\( \newcommand{\vecd}[1]{\overset{-\!-\!\rightharpoonup}{\vphantom{a}\smash {#1}}} \)
\( \newcommand{\id}{\mathrm{id}}\) \( \newcommand{\Span}{\mathrm{span}}\)
( \newcommand{\kernel}{\mathrm{null}\,}\) \( \newcommand{\range}{\mathrm{range}\,}\)
\( \newcommand{\RealPart}{\mathrm{Re}}\) \( \newcommand{\ImaginaryPart}{\mathrm{Im}}\)
\( \newcommand{\Argument}{\mathrm{Arg}}\) \( \newcommand{\norm}[1]{\| #1 \|}\)
\( \newcommand{\inner}[2]{\langle #1, #2 \rangle}\)
\( \newcommand{\Span}{\mathrm{span}}\)
\( \newcommand{\id}{\mathrm{id}}\)
\( \newcommand{\Span}{\mathrm{span}}\)
\( \newcommand{\kernel}{\mathrm{null}\,}\)
\( \newcommand{\range}{\mathrm{range}\,}\)
\( \newcommand{\RealPart}{\mathrm{Re}}\)
\( \newcommand{\ImaginaryPart}{\mathrm{Im}}\)
\( \newcommand{\Argument}{\mathrm{Arg}}\)
\( \newcommand{\norm}[1]{\| #1 \|}\)
\( \newcommand{\inner}[2]{\langle #1, #2 \rangle}\)
\( \newcommand{\Span}{\mathrm{span}}\) \( \newcommand{\AA}{\unicode[.8,0]{x212B}}\)
\( \newcommand{\vectorA}[1]{\vec{#1}} % arrow\)
\( \newcommand{\vectorAt}[1]{\vec{\text{#1}}} % arrow\)
\( \newcommand{\vectorB}[1]{\overset { \scriptstyle \rightharpoonup} {\mathbf{#1}} } \)
\( \newcommand{\vectorC}[1]{\textbf{#1}} \)
\( \newcommand{\vectorD}[1]{\overrightarrow{#1}} \)
\( \newcommand{\vectorDt}[1]{\overrightarrow{\text{#1}}} \)
\( \newcommand{\vectE}[1]{\overset{-\!-\!\rightharpoonup}{\vphantom{a}\smash{\mathbf {#1}}}} \)
\( \newcommand{\vecs}[1]{\overset { \scriptstyle \rightharpoonup} {\mathbf{#1}} } \)
\( \newcommand{\vecd}[1]{\overset{-\!-\!\rightharpoonup}{\vphantom{a}\smash {#1}}} \)
\(\newcommand{\avec}{\mathbf a}\) \(\newcommand{\bvec}{\mathbf b}\) \(\newcommand{\cvec}{\mathbf c}\) \(\newcommand{\dvec}{\mathbf d}\) \(\newcommand{\dtil}{\widetilde{\mathbf d}}\) \(\newcommand{\evec}{\mathbf e}\) \(\newcommand{\fvec}{\mathbf f}\) \(\newcommand{\nvec}{\mathbf n}\) \(\newcommand{\pvec}{\mathbf p}\) \(\newcommand{\qvec}{\mathbf q}\) \(\newcommand{\svec}{\mathbf s}\) \(\newcommand{\tvec}{\mathbf t}\) \(\newcommand{\uvec}{\mathbf u}\) \(\newcommand{\vvec}{\mathbf v}\) \(\newcommand{\wvec}{\mathbf w}\) \(\newcommand{\xvec}{\mathbf x}\) \(\newcommand{\yvec}{\mathbf y}\) \(\newcommand{\zvec}{\mathbf z}\) \(\newcommand{\rvec}{\mathbf r}\) \(\newcommand{\mvec}{\mathbf m}\) \(\newcommand{\zerovec}{\mathbf 0}\) \(\newcommand{\onevec}{\mathbf 1}\) \(\newcommand{\real}{\mathbb R}\) \(\newcommand{\twovec}[2]{\left[\begin{array}{r}#1 \\ #2 \end{array}\right]}\) \(\newcommand{\ctwovec}[2]{\left[\begin{array}{c}#1 \\ #2 \end{array}\right]}\) \(\newcommand{\threevec}[3]{\left[\begin{array}{r}#1 \\ #2 \\ #3 \end{array}\right]}\) \(\newcommand{\cthreevec}[3]{\left[\begin{array}{c}#1 \\ #2 \\ #3 \end{array}\right]}\) \(\newcommand{\fourvec}[4]{\left[\begin{array}{r}#1 \\ #2 \\ #3 \\ #4 \end{array}\right]}\) \(\newcommand{\cfourvec}[4]{\left[\begin{array}{c}#1 \\ #2 \\ #3 \\ #4 \end{array}\right]}\) \(\newcommand{\fivevec}[5]{\left[\begin{array}{r}#1 \\ #2 \\ #3 \\ #4 \\ #5 \\ \end{array}\right]}\) \(\newcommand{\cfivevec}[5]{\left[\begin{array}{c}#1 \\ #2 \\ #3 \\ #4 \\ #5 \\ \end{array}\right]}\) \(\newcommand{\mattwo}[4]{\left[\begin{array}{rr}#1 \amp #2 \\ #3 \amp #4 \\ \end{array}\right]}\) \(\newcommand{\laspan}[1]{\text{Span}\{#1\}}\) \(\newcommand{\bcal}{\cal B}\) \(\newcommand{\ccal}{\cal C}\) \(\newcommand{\scal}{\cal S}\) \(\newcommand{\wcal}{\cal W}\) \(\newcommand{\ecal}{\cal E}\) \(\newcommand{\coords}[2]{\left\{#1\right\}_{#2}}\) \(\newcommand{\gray}[1]{\color{gray}{#1}}\) \(\newcommand{\lgray}[1]{\color{lightgray}{#1}}\) \(\newcommand{\rank}{\operatorname{rank}}\) \(\newcommand{\row}{\text{Row}}\) \(\newcommand{\col}{\text{Col}}\) \(\renewcommand{\row}{\text{Row}}\) \(\newcommand{\nul}{\text{Nul}}\) \(\newcommand{\var}{\text{Var}}\) \(\newcommand{\corr}{\text{corr}}\) \(\newcommand{\len}[1]{\left|#1\right|}\) \(\newcommand{\bbar}{\overline{\bvec}}\) \(\newcommand{\bhat}{\widehat{\bvec}}\) \(\newcommand{\bperp}{\bvec^\perp}\) \(\newcommand{\xhat}{\widehat{\xvec}}\) \(\newcommand{\vhat}{\widehat{\vvec}}\) \(\newcommand{\uhat}{\widehat{\uvec}}\) \(\newcommand{\what}{\widehat{\wvec}}\) \(\newcommand{\Sighat}{\widehat{\Sigma}}\) \(\newcommand{\lt}{<}\) \(\newcommand{\gt}{>}\) \(\newcommand{\amp}{&}\) \(\definecolor{fillinmathshade}{gray}{0.9}\)Learning Objectives
- Define main effect, simple effect, interaction, and marginal mean
- State the relationship between simple effects and interaction
- Compute the source of variation and df for each effect in a factorial design
- Plot the means for an interaction
- Define three-way interaction
Basic Concepts and Terms
In the "Bias Against Associates of the Obese" case study, the researchers were interested in whether the weight of a companion of a job applicant would affect judgments of a male applicant's qualifications for a job. Two independent variables were investigated:
- whether the companion was obese or of typical weight and
- whether the companion was a girlfriend or just an acquaintance.
One approach could have been to conduct two separate studies, one with each independent variable. However, it is more efficient to conduct one study that includes both independent variables. Moreover, there is a much bigger advantage than efficiency for including two variables in the same study: it allows a test of the interaction between the variables. There is an interaction when the effect of one variable differs depending on the level of a second variable. For example, it is possible that the effect of having an obese companion would differ depending on the relationship to the companion. Perhaps there is more prejudice against a person with an obese companion if the companion is a girlfriend than if she is just an acquaintance. If so, there would be an interaction between the obesity factor and the relationship factor.
There are three effects of interest in this experiment:
- Weight: Are applicants judged differently depending on the weight of their companion?
- Relationship: Are applicants judged differently depending on their relationship with their companion?
- Weight x Relationship Interaction: Does the effect of weight differ depending on the relationship with the companion?
The first two effects (Weight and Relationship) are both main effects. A main effect of an independent variable is the effect of the variable averaging over the levels of the other variable(s). It is convenient to talk about main effects in terms of marginal means. A marginal mean for a level of a variable is the mean of the means of all levels of the other variable. For example, the marginal mean for the level "Obese" is the mean of "Girlfriend Obese" and "Acquaintance Obese." Table \(\PageIndex{1}\) shows that this marginal mean is equal to the mean of \(5.65\) and \(6.15\), which is \(5.90\). Similarly, the marginal mean for the level "Typical" is the mean of \(6.19\) and \(6.59\), which is \(6.39\). The main effect of Weight is based on a comparison of these two marginal means. Similarly, the marginal means for "Girlfriend" and "Acquaintance" are \(5.92\) and \(6.37\).
| Companion Weight | ||||
|---|---|---|---|---|
| Obese | Typical | Marginal Mean | ||
| Relationship | Girlfriend | 5.65 | 6.19 | 5.92 |
| Acquaintance | 6.15 | 6.59 | 6.37 | |
| Marginal Mean | 5.90 | 6.39 | ||
In contrast to a main effect, which is the effect of a variable averaged across levels of another variable, the simple effect of a variable is the effect of the variable at a single level of another variable. The simple effect of Weight at the level of "Girlfriend" is the difference between the "Girlfriend Typical" and the "Girlfriend Obese" conditions. The difference is \(6.19-5.65 = 0.54\). Similarly, the simple effect of Weight at the level of "Acquaintance" is the difference between the "Acquaintance Typical" and the "Acquaintance Obese" conditions. The difference is \(6.59-6.15 = 0.44\).
Recall that there is an interaction when the effect of one variable differs depending on the level of another variable. This is equivalent to saying that there is an interaction when the simple effects differ. In this example, the simple effects of weight are \(0.54\) and \(0.44\). As shown below, these simple effects are not significantly different.
Tests of Significance
The important questions are not whether there are main effects and interactions in the sample data. Instead, what is important is what the sample data allow you to conclude about the population. This is where Analysis of Variance comes in. ANOVA tests main effects and interactions for significance. An ANOVA Summary Table for these data is shown in Table \(\PageIndex{2}\).
| Source | df | SSQ | MS | F | p |
|---|---|---|---|---|---|
| Weight | 1 | 10.4673 | 10.4673 | 6.214 | 0.0136 |
| Relation | 1 | 8.8144 | 8.8144 | 5.233 | 0.0234 |
| W x R | 1 | 0.1038 | 0.1038 | 0.062 | 0.8043 |
| Error | 172 | 289.7132 | 1.6844 | ||
| Total | 175 | 310.1818 |
Consider first the effect of "Weight." The degrees of freedom (\(df\)) for "Weight" is \(1\). The degrees of freedom for a main effect is always equal to the number of levels of the variable minus one. Since there are two levels of the "Weight" variable (typical and obese), the \(df\) is \(2 - 1 = 1\). We skip the calculation of the sum of squares (\(SSQ\)) not because it is difficult, but because it is so much easier to rely on computer programs to compute it. The mean square (\(MS\)) is the sum of squares divided by the \(df\). The \(F\) ratio is computed by dividing the \(MS\) for the effect by the \(MS\) for error (\(MSE\)). For the effect of "Weight," \(F = 10.4673/1.6844 = 6.214\). The last column, \(p\), is the probability of getting an \(F\) of \(6.214\) or larger given that there is no effect of weight in the population. The \(p\) value is \(0.0136\) and therefore the null hypothesis of no main effect of "Weight" is rejected. The conclusion is that being accompanied by an obese companion lowers judgments of qualifications.
The effect "Relation" is interpreted the same way. The conclusion is that being accompanied by a girlfriend leads to lower ratings than being accompanied by an acquaintance.
The \(df\) for an interaction is the product of the \(df's\) of variables in the interaction. For the "Weight x Relation" interaction (\(W \times R\)), the \(df = 1\) since both Weight and Relation have one \(df: 1 \times 1 = 1\). The \(p\) value for the interaction is \(0.8043\), which is the probability of getting an interaction as big or bigger than the one obtained in the experiment if there were no interaction in the population. Therefore, these data provide no evidence for an interaction. Always keep in mind that the lack of evidence for an effect does not justify the conclusion that there is no effect. In other words, you do not accept the null hypothesis just because you do not reject it.
For "Error," the degrees of freedom is equal to the total number of observations minus the total number of groups. The sample sizes of the four conditions in this experiment are shown in Table \(\PageIndex{3}\). The total number of observations is \(40 + 42 + 40 + 54 = 176\). Since there are four groups, \(dfe = 176 - 4 = 172\).
| Companion Weight | |||
|---|---|---|---|
| Obese | Typical | ||
| Relationship | Girlfriend | 40 | 42 |
| Acquaintance | 40 | 54 | |
The final row in the ANOVA Summary Table is "Total." The degrees of freedom total is equal to the sum of all degrees of freedom. It is also equal to the \(\textit{number of observations minus 1}\), or \(176 - 1 = 175\). When there are equal sample sizes, the sum of squares total will equal the sum of all other sums of squares. However, when there are unequal sample sizes, as there are here, this will not generally be true. The reasons for this are complex and are discussed in the section Unequal Sample Sizes.
Plotting Means
Although the plot shown in Figure \(\PageIndex{1}\) illustrates the main effects as well as the interaction (or lack of an interaction), it is called an interaction plot. It is important to consider the components of this plot carefully. First, the dependent variable is on the \(Y\)-axis. Second, one of the independent variables is on the \(X\)-axis. In this case, it is the variable "Weight." Finally, a separate line is drawn for each level of the other independent variable. It is better to label the lines right on the graph, as shown here, than with a legend.

If you have three or more levels on the \(X\)-axis, you should not use lines unless there is some numeric ordering to the levels. If your variable on the \(X\)-axis is a qualitative variable, you can use a plot such as the one in Figure \(\PageIndex{2}\). However, as discussed in the section on bar charts, it would be better to replace each bar with a box plot.
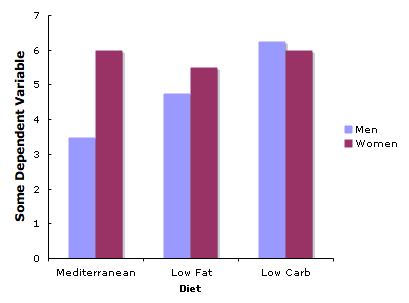
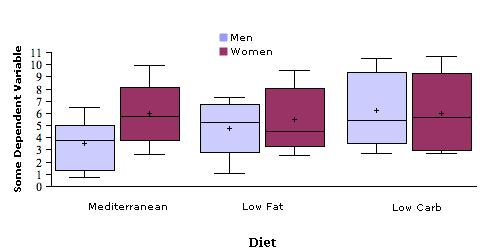
Figure \(\PageIndex{3}\) shows such a plot. Notice how it contains information about the medians, quantiles, and minimums and maximums not contained in Figure \(\PageIndex{2}\). Most important, you get an idea about how much the distributions overlap from Figure \(\PageIndex{3}\) which you do not get from Figure \(\PageIndex{2}\).
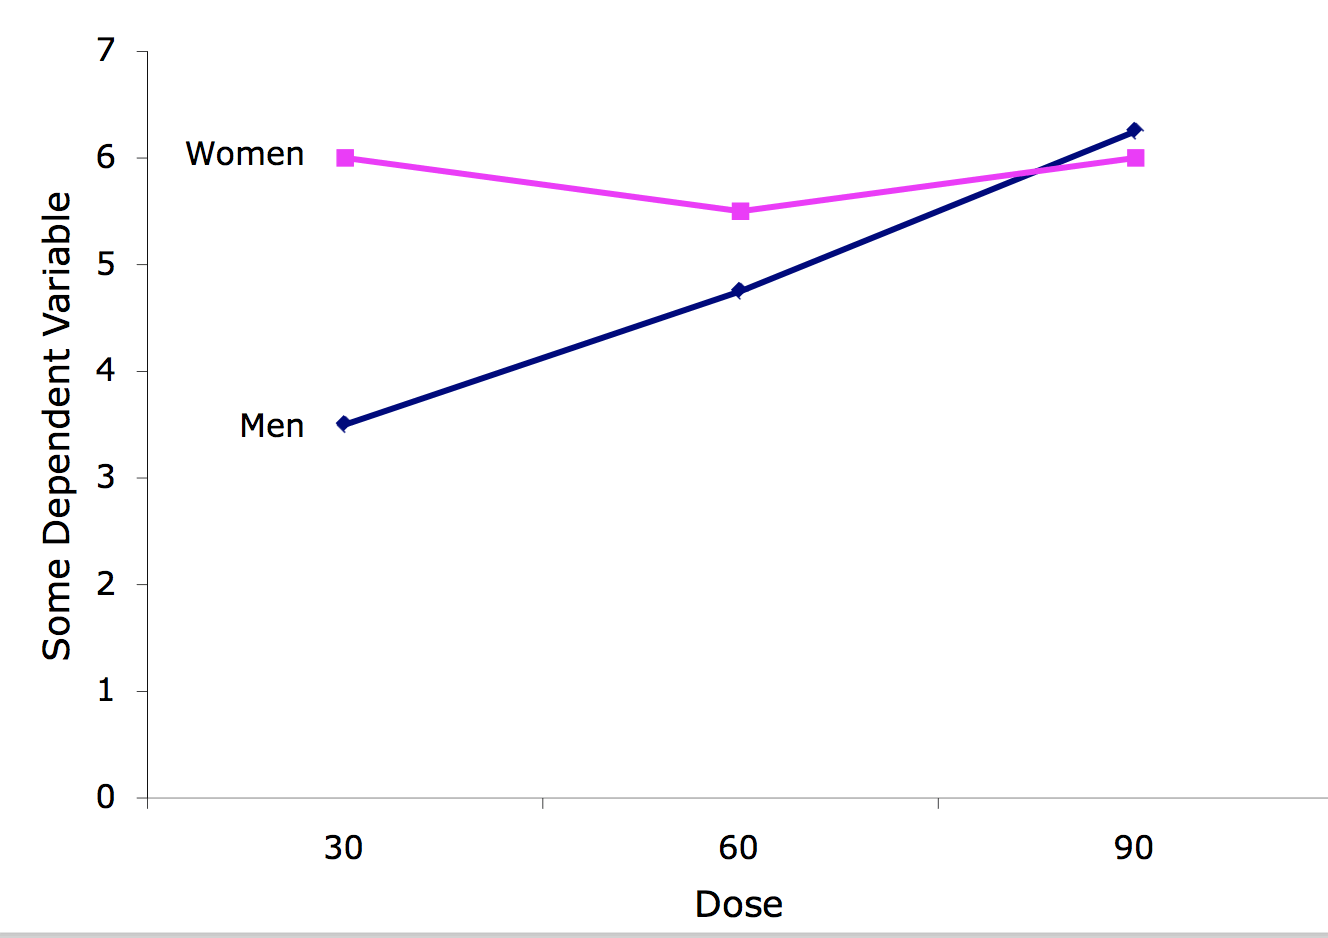
Line graphs are a good option when there are more than two levels of a numeric variable. Figure \(\PageIndex{4}\) shows an example. A line graph has the advantage of showing the pattern of interaction clearly. Its disadvantage is that it does not convey the distributional information contained in box plots.
An Example with Interaction
The following example was presented in the section on specific comparisons among means. It is also relevant here.
This example uses the made-up data from a hypothetical experiment shown in Table \(\PageIndex{4}\). Twelve subjects were selected from a population of high-self-esteem subjects and an additional \(12\) subjects were selected from a population of low-self-esteem subjects. Subjects then performed on a task and (independent of how well they really did) half in each esteem category were told they succeeded and the other half were told they failed. Therefore, there were six subjects in each of the four esteem/outcome combinations and \(24\) subjects in all.
After the task, subjects were asked to rate (on a \(10\)-point scale) how much of their outcome (success or failure) they attributed to themselves as opposed to being due to the nature of the task.
| Esteem | |||
|---|---|---|---|
| High | Low | ||
| Outcome | Success | 7 | 6 |
| 8 | 5 | ||
| 7 | 7 | ||
| 8 | 4 | ||
| 9 | 5 | ||
| 5 | 6 | ||
| Failure | 4 | 9 | |
| 6 | 8 | ||
| 5 | 9 | ||
| 4 | 8 | ||
| 7 | 7 | ||
| 3 | 6 | ||
The ANOVA Summary Table for these data is shown in Table \(\PageIndex{5}\).
| Source | df | SSQ | MS | F | p |
|---|---|---|---|---|---|
| Outcome | 1 | 0.0417 | 0.0417 | 0.0256 | 0.8744 |
| Esteem | 1 | 2.0417 | 2.0417 | 1.2564 | 0.2756 |
| O x E | 1 | 35.0417 | 35.0417 | 21.5641 | 0.0002 |
| Error | 20 | 32.5000 | 1.6250 | ||
| Total | 23 | 69.6250 |
As you can see, the only significant effect is the \(Outcome \times Esteem\) (\(O \times E\)) interaction. The form of the interaction can be seen in Figure \(\PageIndex{5}\).
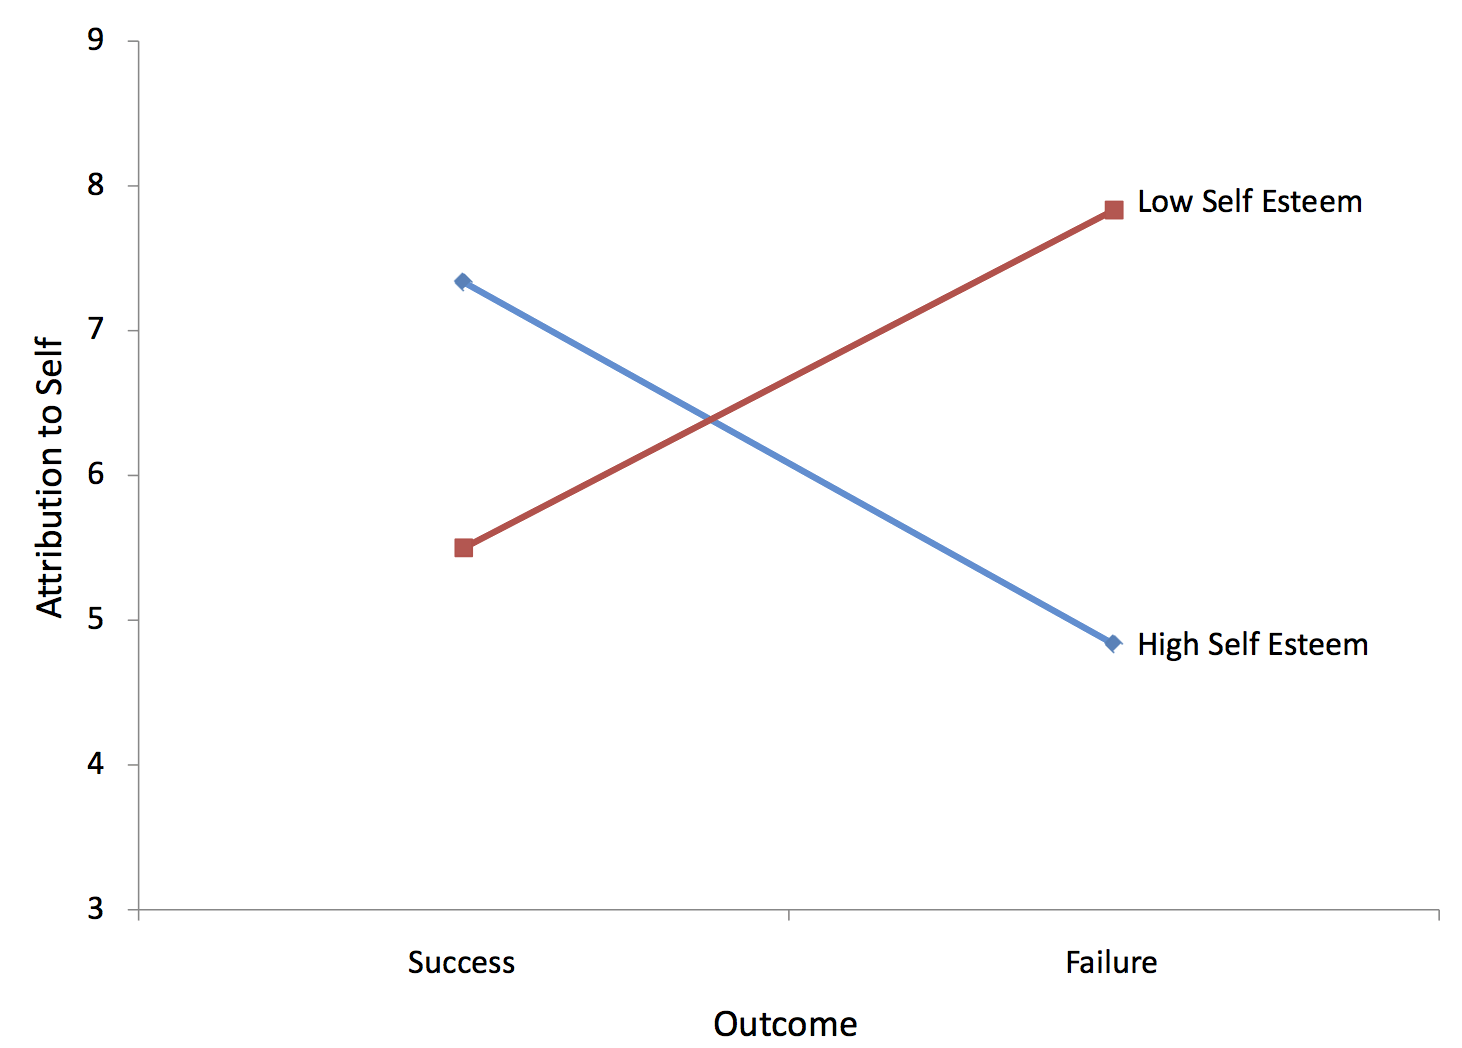
Clearly the effect of "Outcome" is different for the two levels of "Esteem": For subjects high in self-esteem, failure led to less attribution to oneself than did success. By contrast, for subjects low in self-esteem, failure led to more attribution to oneself than did success. Notice that the two lines in the graph are not parallel. Nonparallel lines indicate interaction. The significance test for the interaction determines whether it is justified to conclude that the lines in the population are not parallel. Lines do not have to cross for there to be an interaction.
Three-Factor Designs
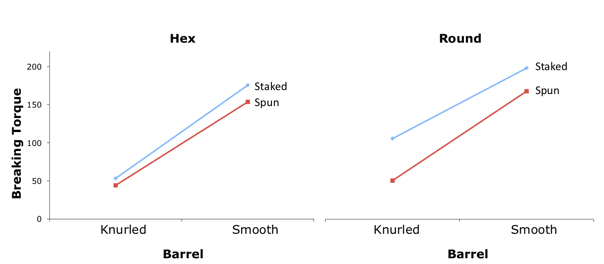
Three-factor designs are analyzed in much the same way as two-factor designs. Table \(\PageIndex{6}\) shows the analysis of a study described by Franklin and Cooley investigating three factors on the strength of industrial fans:
- Hole Shape (Hex or Round)
- Assembly Method (Staked or Spun), and
- Barrel Surface (Knurled or Smooth).
The dependent variable, Breaking Torque, was measured in foot-pounds. There were eight observations in each of the eight combinations of the three factors.
As you can see in Table \(\PageIndex{6}\), there are three main effects, three two-way interactions, and one three-way interaction. The degrees of freedom for the main effects are, as in a two-factor design, equal to the number of levels of the factor minus one. Since all the factors here have two levels, all the main effects have one degree of freedom. The interaction degrees of freedom is always equal to the product of the degrees of freedom of the component parts. This holds for the three-factor interaction as well as for the two-factor interactions. The error degrees of freedom is equal to the number of observations (\(64\)) minus the number of groups (\(8\)) and equals \(56\).
| Source | df | SSQ | MS | F | p |
|---|---|---|---|---|---|
| Hole | 1 | 8258.27 | 8258.27 | 266.68 | <0.0001 |
| Assembly | 1 | 13369.14 | 13369.14 | 431.73 | <0.0001 |
| H x A | 1 | 2848.89 | 2848.89 | 92.00 | <0.0001 |
| Barrel | 1 | 35.0417 | 35.0417 | 21.5641 | <0.0001 |
| H x B | 1 | 594.14 | 594.14 | 19.1865 | <0.0001 |
| A x B | 1 | 135.14 | 135.14 | 4.36 | 0.0413 |
| H x A x B | 1 | 1396.89 | 1396.89 | 45.11 | <0.0001 |
| Error | 56 | 1734.12 | 30.97 | ||
| Total | 63 | 221386.91 |
A three-way interaction means that the two-way interactions differ as a function of the level of the third variable. The usual way to portray a three-way interaction is to plot the two-way interactions separately. Figure \(\PageIndex{6}\) shows the \(\text{Barrel (Knurled or Smooth)} \times \text{Assembly (Staked or Spun)}\) separately for the two levels of Hole Shape (Hex or Round). For the Hex Shape, there is very little interaction with the lines being close to parallel with a very slight tendency for the effect of Barrel to be bigger for Staked than for Spun. The two-way interaction for the Round Shape is different: The effect of Barrel is bigger for Spun than for Staked. The finding of a significant three-way interaction indicates that this difference in two-way interactions is significant.
Formatting Data for Computer Analysis
The data in Table \(\PageIndex{4}\) have been reformatted in Table \(\PageIndex{7}\). Note how there is one column to indicate the level of outcome and one column to indicate the level of esteem. The coding is as follows:
High self-esteem: \(1\)
Low self-esteem: \(2\)
Success: \(1\)
Failure: \(2\)
| outcome | esteem | attrib |
|---|---|---|
| 1 | 1 | 7 |
| 1 | 1 | 8 |
| 1 | 1 | 7 |
| 1 | 1 | 8 |
| 1 | 1 | 9 |
| 1 | 1 | 5 |
| 1 | 2 | 6 |
| 1 | 2 | 5 |
| 1 | 2 | 7 |
| 1 | 2 | 4 |
| 1 | 2 | 5 |
| 1 | 2 | 6 |
| 2 | 1 | 4 |
| 2 | 1 | 6 |
| 2 | 1 | 5 |
| 2 | 1 | 4 |
| 2 | 1 | 7 |
| 2 | 1 | 3 |
| 2 | 2 | 9 |
| 2 | 2 | 8 |
| 2 | 2 | 9 |
| 2 | 2 | 8 |
| 2 | 2 | 7 |
| 2 | 2 | 6 |
To use Analysis Lab to do the calculations, you would copy the data and then
- Click the "Enter/Edit Data" button. (You may be warned that for security reasons you must use the keyboard shortcut for pasting data.)
- Paste your data.
- Click "Accept Data."
- Click the "Advanced" button next to the "ANOVA" button.
- Select "attrib" as the dependent variable and both "outcome" and "esteem" as "group" variables.
- Click the "Do ANOVA" button.